Running a livestream can be intimidating if you’ve never done it before. But the good news is you can get started very quickly and easily with just a computer and an internet connection. This guide will walk you through the whole process from start to finish.
About this guide
We’ve written this guide for people who have never run a livestream before, to cover all the basics you need to know. If you plan to employ the help of professionals to run your stream, this guide should arm you with the information so that you can ask for what you want. And even if you’ve already dipped your toe into the world of livestreaming, we hope you’ll find this guide contains lots of useful information for you too.
The sections of this guide are as follows:
- The benefits of livestreaming
- How livestreaming works
- Comparison of streaming platforms
- Software to run your livestream
- Livestreaming equipment and setup
- How to run a successful livestream
- Troubleshooting common livestreaming issues
- Bonus livestreaming tips
You can click on any one of the links above to jump straight to the relevant section.
This guide is brought to you by the team behind Vito, a platform for livestreaming and running community-first online events. We’ll be referencing Vito in places throughout the guide, but it has plenty of valuable pointers even if you’re streaming on a different platform.
The benefits of livestreaming
Online video consumption is on the rise every year. This is hardly surprising. Compared to static images or text, video captures our attention quicker, keeps it longer, and is more memorable. The question is whether you should pre-record or livestream your video.
There are advantages to both livestreaming and pre-recording videos. The latter of course allows for retakes and editing, which can lead to more professional results. But livestreaming has plenty of other advantages that make it worth the effort. Let’s look at 8 of them now.
Get started quickly
Following the instructions in this guide, you can get started livestreaming in around 5 minutes, which is a lot quicker than the time it takes to record, edit, export and upload a video. So streaming is a great option if you’re busy or you want to get your content out into the world quickly. It’s also easier than you might think and highly cost effective.
Be authentic and spontaneous
Livestreaming can be nerve racking, but the accompanying adrenaline injects energy into your content that’s hard to replicate with pre-recorded videos. Audiences tend to be more forgiving because they understand the nature of live is that “anything can happen”. So if perfectionistic tendencies have stood in the way of producing video content in the past, streaming is a great way to take the plunge.
Build trust
The transparency and unfiltered nature of going live can be a great way to let your community feel closer to you. While highly edited videos can look more professional, they also put a distance between you and your audience. On the other hand, speaking live to camera is like being on a video call with someone you know, and helps build trust.
Create a shared, real-time experience
There’s something inherently exciting about knowing you’re witnessing something as it’s happening, and that lots of people all around the world are experiencing it at the exact same time as you. That immediacy is what gives livestreaming the edge over pre-recorded video.
Connect with your audience
Livestreaming your content on a platform that also incorporates a discussion or comments feature gives you the opportunity to see how your audience is responding in real-time and personalize the content accordingly. For instance, you can greet audience members by name or answer their questions live on air. Your audience will feel like a part of the show rather than a passive spectator.

Set the schedule
By livestreaming your content, you can time it around when you’re able to moderate the chat and respond to people quickly. You can create more of a sense of occasion and excitement if you encourage your audience to watch and interact during a set time, rather than at their leisure. If you’re worried about people missing out, you can make the livestream file available to play following the broadcast on many services including Vito.
Incorporate pre-recorded video
With livestreaming, there’s nothing preventing you from including pre-recorded elements as well. In fact it can be a very effective way to keep the pacing of your broadcast interesting, add professional touches, achieve things that aren’t possible during a live broadcast, and give you an opportunity to take a breather in the middle of your stream. Later in the guide, we’ll explain how to cue up different scenes in your livestreaming tool of choice.
Bring your event online
The beauty of the internet is that it’s still possible to connect with your audience even when you can’t meet in person. You can create a rich online experience by combining a livestream with community features. With Vito, this is all in a single interface. And an added bonus is that you can actually increase your reach and bring in audiences who might not otherwise have been able to attend. So even where you are able to run your event in person, you could consider making a livestream an additional element.
How livestreaming works
As the name suggests, livestreaming means broadcasting a video (and usually audio) to an audience in real-time — although it’s actually more like a delay of around 10-40 seconds. This is known as latency, and it’s the delay between your camera capturing the footage, and the footage being displayed on the viewer’s device. Latency can’t be totally avoided, but the good news is it doesn’t negatively affect your audience. To them, everything will look like it’s happening in real time, even though technically it’s happening a few moments in the past!
You’ll stream from your computer, so you’ll need an internet connection. You’ll also need a camera and a microphone if you plan to stream your face and voice. The ones built into your computer will do the trick to begin with, but we have some recommendations later in the post for fancier gear that will get you more professional results.
Next, you need to choose where you’re going to stream to, and what software you’ll use to do it. Don’t worry — this guide provides all the information you need to figure this part out.
For now, the main thing to know is that whatever you can have on your computer screen, you can stream. So this could be your webcam, your browser window, a slideshow, a video call or any combination of these. Many streaming tools allow you to set up different “scenes” and transition between them on the fly, which we’ll look at in more detail later in this guide.
The other key thing to note is that there are platforms to broadcast to, and software you can stream from. This can be a little confusing at first, if you’re used to video conferencing applications like Zoom which allow everyone to dial in within a single tool.
Livestreaming is more like a television broadcast than a multiway call (although you can also display a video call within a livestream). You need to choose which platform you’re going to display your broadcast on, and what production software you’re going to use to send your video to wherever it’s going to be shown. If that sounds a bit confusing, here’s an infographic to make it clearer:

The good news is that most streaming software works in a pretty similar way — at least the part where you connect to a platform and go live — so once you’ve played around with one of them, it’s generally very easy to transfer those skills to another tool.
Most of the big streaming software has built-in support for connecting to popular platforms, like Twitch and YouTube Live (which we’ll look at in more detail later in the post).
For any other platforms which aren’t listed as presets, you can use the “Custom key” option. This is sometimes called RTMP, which stands for real-time messaging protocol. You simply enter a URL and a unique stream key, provided by the platform you’re streaming to, and you’ll be connected and ready to stream.
But we’re getting a little ahead of ourselves. First, let’s look at some platforms you can stream on, and then we’ll explore some options for tools you can use to set up and run your stream.
Comparison of streaming platforms
There are a ton of options when it comes to platforms to stream on, and which one you pick really depends on your content, the type of experience you want to create for your audience, and what features you’re looking for as a streamer.
In this section of the guide, we’ll touch on a handful of the different options. Rather than provide a straight-up comparison of features, we’ll look at where we think each platform shines and what it’s best suited for.
Twitch
Many people are familiar with Twitch as a place for gamers to stream, but there are lots of types of creators on the platform, including musicians, DJs, artists and chefs.
Twitch could be a great option for you if:
- You stream regularly. You can become a Twitch “Affiliate” by maintaining a regular broadcasting schedule and building a thriving audience. It takes a high commitment but can reap rewards.
- You want to make money from your content. If you have Affiliate status, you can make use of Twitch’s monetization tools such as subscriptions and “Bits” (kind of like a tip jar) to earn an income from your content.
- You have an existing audience. While Twitch does have a discovery engine, it’s fiercely competitive and the algorithm seems to favour certain creators so it can be hard to build a fanbase from scratch. It’s therefore easier to gain momentum if you can bring in an existing audience from elsewhere, such as a mailing list.
- Your audience is tech-savvy. Twitch’s interface has lots of content on offer and a fast-paced chat section, so it can be a little tricky to navigate at first.
In short: Twitch is great for creators who post often, want to monetize their content, and have an existing tech-savvy audience.
YouTube Live
With around 2 billion users worldwide — accounting for almost 80% of people on the Internet — YouTube is an obvious choice for lots of streamers because their audience is almost guaranteed to be familiar with the platform.
YouTube Live could be well suited to you if:
- You have a verified YouTube or Google account. It’s free to set up an account and when you request verification, it takes 24 hours to activate your account for streaming. If you want to embed the stream on your website, you also need a linked Google AdSense account.
- You want to benefit from Google’s searchability. Google favours YouTube content in search results, and YouTube also has a great search function.
- Your audience can access YouTube. It’s worth noting that several countries including China and Iran have a total block on YouTube, and lots of organizations such as schools block the site by default.
- You want anyone to be able to watch your stream. YouTube allows you to go live and have your audience tune in without needing to sign up or sign in, provided they’re in a location that has access to YouTube.
In short: YouTube is well suited to streamers who want lots of people to have easy access to watch the broadcast without needing to log in.
Facebook Live
Believe it or not, Facebook has even more active users than YouTube! Again, it’s a popular choice for many brands to stream to, because that’s where a lot of their audience already hangs out.
Facebook Live could be a solid choice for you if:
- You’re a start-up, solopreneurs or business who already has a Facebook group or fan page.
- You want to benefit from Facebook’s engagement features. Comments, likes and emoji reactions are all built in, and these engagements often show up in the timelines of people connected to your viewers, giving you more exposure.
- Your stream is less than 90 minutes long. You cannot currently run a live broadcast that lasts longer than that.
- You don’t need a lot of control over how your content is presented. The Facebook algorithm will show ads and recommend related content alongside your stream, so that’s something to be aware of if you prefer to control what gets shown to your audience.
In short: Facebook Live is great for people who want to stream for 90 minutes or less and benefit from built-in engagement tools.
Vito
This might be the platform on the list you’re least familiar with, but of course we had to include it as we built it! In Vito, you can create a hub, stream to it, host discussions and add custom pages and pre-recorded videos. Everything is displayed in an easy to navigate interface, that’s accessible to your audience, whoever and wherever they are.
Vito is a great choice for you if:
- You want to control who has access to your stream. Create a private Vito hub and invite attendees or sell access, and only those people will be able to watch the stream, making Vito a perfect choice for events and communities.
- You want an ad-free streaming experience. The video player in Vito is completely free of ads or pop-ups, so your content is the only thing your audience will see.
- You want to facilitate conversation. Vito hubs allow for customizable discussion threads with moderation tools to help you keep your participants safe. This sits right alongside the video player, so your audience can chat while they watch (or they can hide it for a distraction-free experience).
- You want to add extra context. You can create pages within your hub sharing additional content, resources and links that your audience might find useful. You can also display an agenda, sponsors, offers, presenter bios and more.
In short: Vito allows you to create private, flexible hubs to stream and host conversations in, perfect for events and communities.
And if you’re streaming short-form videos and your audience is mainly on mobile, you might also want to check out lightweight options like Instagram Live (owned by Facebook) and Periscope (owned by Twitter).
Software to run your livestream
As I mentioned in an earlier section, streaming is different from video conferencing (such as Zoom) in that you usually send your video from a different tool than the one where you’ll be displaying it. So in addition to deciding where to host your stream, you’ll also need to choose which streaming software you’ll use.
You may have heard of “encoding” before. This essentially means translating video for broadcast on the web. The following applications do the job of encoding the video while also giving you production capabilities. Although this means needing to learn and use an additional piece of software, it gives you tons of flexibility and options.
You can mix live and pre-recorded content seamlessly, edit on the fly with lower thirds and banners, change scenes, stream video calls, run intermission holding slides, and lots more. We’ll dive into specifics on these topics later in the guide. If you’re working with an AV technician for your event livestream, chances are they’ll be familiar with this kind of software already.
There are a bunch of different streaming apps to choose from, so we’ll stick to the approach of exploring a handful of popular options and outlining what they’re particularly well suited for.
OBS Studio
OBS Studio is a free, open-source, cross platform tool with lots of useful features. There’s also an extensive resources section, forum and help documentation on their site, so you’ll almost always be able to find answers to your questions. Like any new tool, it might take a bit of getting used to if you’re brand new to streaming, so you may want to allow some time to play around beforehand.
Things to know:
- OBS Studio is available for Mac, Windows and Linux.
- You need to download it to your computer.
- It’s free, open source and regularly updated.
- It allows you to cue up pre-recorded videos and holding slides, and easily switch between different scenes and sources. So it’s great if you’re running a mix of pre-recorded and live content, or you want to switch between different camera angles on the fly, for instance.
- Despite being a little intimidating at first glance with its multiple panels, it’s actually pretty easy to learn. Check out our tutorial for using OBS Studio with Vito, for step-by-step instructions.

Streamlabs OBS
Streamlabs builds on OBS, the livestreaming app we just looked at. As you can see from the screenshot below, Streamlabs OBS is very similar but has a slightly fancier interface. It also offers a few free, pre-set animations and holding slides like the one shown below.
Things to know:
- Streamlabs OBS is available for Mac and Windows.
- You need to download it to your computer.
- It’s free to use.
- It has very similar functionality to OBS Studio, so you can cue up different scenes and set up sources, allowing you to mix pre-recorded and live video.
- The layout is highly customizable, so you can choose what blocks you need and where they should go.
- You don’t need to create a Streamlabs account to be able to stream, but there is the option to log in with your Twitch, Facebook or YouTube account and get access to additional features. If you decide to pay for Streamlabs’ Prime subscription, you get access to advanced features including multistreaming, custom themes and apps.

Ecamm Live
Ecamm Live calls itself the “all-in-one livestreaming production platform for Mac”, and it’s what we usually use to run livestreams at our own events on Vito.
Things to know:
- Ecamm Live is available for Mac only.
- You need to download it to your computer.
- There’s a 14 day free trial and after that it costs from $12-25 a month.
- Like the previous two options, with Ecamm Live you can cue up different scenes and set up sources, allowing you to mix pre-recorded and live video.
- It has a native integration with Skype for slick looking group calls.
- Ecamm Live is a fully-featured tool, with options like picture in picture, overlays, built-in sound effects, zooming and panning, and more, so it’s a good choice for running a professional show.
- The trade-off is an interface with a lot of options at first glance, so it could be a bit intimidating if you’re completely new to livestreaming. Luckily, they have plenty of solid documentation.

StreamYard
StreamYard is a little different to the options we’ve looked at so far in that it’s browser-based and has built-in support for video calling, making it a great option for fully live shows that involve interviews or panel discussions.
Things to know:
- StreamYard is browser-based so there’s nothing to download and you can use it on any computer with an internet connection.
- You can create a call link and send it to your colleagues or speakers so that they can join you via the browser, and you can then edit on the fly and control the configuration of how people are displayed in the stream.
- It has a free tier, but you’ll need a paid account ($25 monthly) to stream to platforms like Vito that use the custom RTMP option.
- It doesn’t natively support pre-recorded videos beyond 5 minutes in length, although there are workarounds with screensharing if you’re happy to experiment.
- StreamYard is great if you’re brand new to streaming, because it’s really fun and lightweight to use.

Zoom
You might wonder what Zoom is doing in this section, as it’s not really livestreaming software, rather video conferencing software. However, although its feature set is different to some of the apps I’ve described above, I wanted to include it because it is actually possible to stream a Zoom call to another platform!
The example we’ll use here is our own platform, Vito, which allows you to create an event hub with pages of custom content, playlists of pre-recorded videos, live-updating agenda, discussion threads, a directory of participants, code of conduct and more. So you can see how being able to broadcast a Zoom call to play inside of a Vito hub suddenly gives you a lot more options.
Things to know:
- You can stream a webinar or a meeting from Zoom to another platform.
- You’ll need to enable Custom Live Streaming Service at Admin level in Zoom first.
- You’ll also need to have a Pro, Business, Education, or Enterprise account with Zoom.
- There’s a Zoom watermark in the bottom right corner in my example video. There’s a beta option to replace this with your own watermark, but it will still say “Powered by Zoom” underneath.
See our tutorial for how to broadcast a Zoom call to a Vito hub.
Livestreaming equipment and setup
All you actually need to run a livestream is a computer, an internet connection, a webcam if you’ll be showing yourself, and a microphone if you’ll be speaking. Of course, there are plenty of options for taking your setup from basic to more professional.
We won’t recommend any specific products here because it all depends on your budget and what’s available to you, but here are some general considerations you might want to keep in mind.
Computer
You’ll want to be using a machine that has a decent amount of power. So that’ll likely be either a desktop or a high-powered laptop. There’s no single set of precise specifications as there are so many different computers on the market, and it depends on what you’re streaming.
As a rule, you’ll want to use a machine with at least 8GB of RAM, the built-in memory that determines your computer’s performance. If you’re gaming and livestreaming at the same time, 16GB+ is a safer bet.
If you’ll mainly be streaming your webcam, browser, pre-recorded video and calls (rather than gaming), then most newer higher-powered machines should be adequate in terms of processor, graphics card and SSD (solid state hard drive) but you’ll definitely want to run a few tests to make sure. It also helps to have plenty of USB ports available in case you need to plug in any peripherals like mics or cameras.
If you’re using a PC, you should ideally be running Windows 7 or later. On Mac, you’ll probably want to be on 10.12 Sierra or above (depending on what the livestreaming software minimum requirements are).
Connection
Your connection plays a significant role in the performance of your stream. A wired internet connection to a fast internet service will give you the best performance as well as peace of mind that your wifi isn’t going to cut out.
What counts as fast? This varies depending on where you look, and the recommendations can be confusing for beginners to decipher, with talk of bitrates and frames per second, and copious use of numbers and acronyms.
This guide aims to keep things simple. You can check your speed using a tool like fast.com. Ideally, your upload speed should be at least 10Mbps (megabits per second), though it is still possible to stream if your speeds are lower. However, if you want to stream in 4k quality (Ultra High Definition), then your upload speed will need to be even higher, around 50Mbps.
Video
You’ll need a camera if you want to show yourself on stream. There’s no single right answer as to which one to go for, other than you should use the highest quality camera you have access to.
In general we’ve found in-built laptop cameras to generally be the poorest quality. The image can tend to look “soft” and the colors washed out. On the flipside, it’s a very convenient option that doesn’t require any additional USB ports. So if you do use a laptop webcam we recommend lighting yourself very well to improve the picture quality, and also elevating the laptop so that the camera is at eye level rather than angled up your nose.
Another option is to pick up a dedicated 1080p USB webcam. Decent ones can be found for $50-$100, and most modern ones are either plug-and-play or just require you to quickly download a driver. Obviously they require a USB port, and often the in-built microphone still leaves something to be desired in terms of sound quality, so you may be better off using a headset or dedicated mic alongside the webcam.
Another surprisingly high quality option could be the back-facing camera on your phone, especially if you have a newer iPhone, Google Pixel, Samsung Galaxy or similar. This is a great choice for pre-recording videos to include within a stream, but it can be fiddly to use your phone as a webcam. There are apps such as Reincubate Camo and EpocCam (formerly Kinoni) you can use to make this easier, but on balance it’s definitely less hassle to just use a dedicated webcam if your budget allows.
Finally, you might want to try using an existing or new DSLR or digital camera as your webcam, especially if a high quality picture is very important to you. Your exact setup will depend on the make and model of your camera and computer, but to get everything working properly you may need to look into getting some or all of the following:
- Audio video capture card. This looks like a small USB dongle with an HDMI input on the other end, and allows your computer to read your camera as a webcam.
- Micro HDMI to HDMI cable. The micro end goes into your camera (if supported) and the regular HDMI end goes into the capture card.
- USB power adapter. This is essentially a dummy battery that replaces the battery in your camera, but has a cable coming out of the bottom of it with a USB connector on the other end — so you can plug your camera in to your computer and keep it powered without worrying about the battery losing charge.
- Tripod or mount. This will enable you to position your camera somewhere that looks natural, ideally around eye level.
Here’s a simplistic diagram (not to scale) showing how everything fits together:
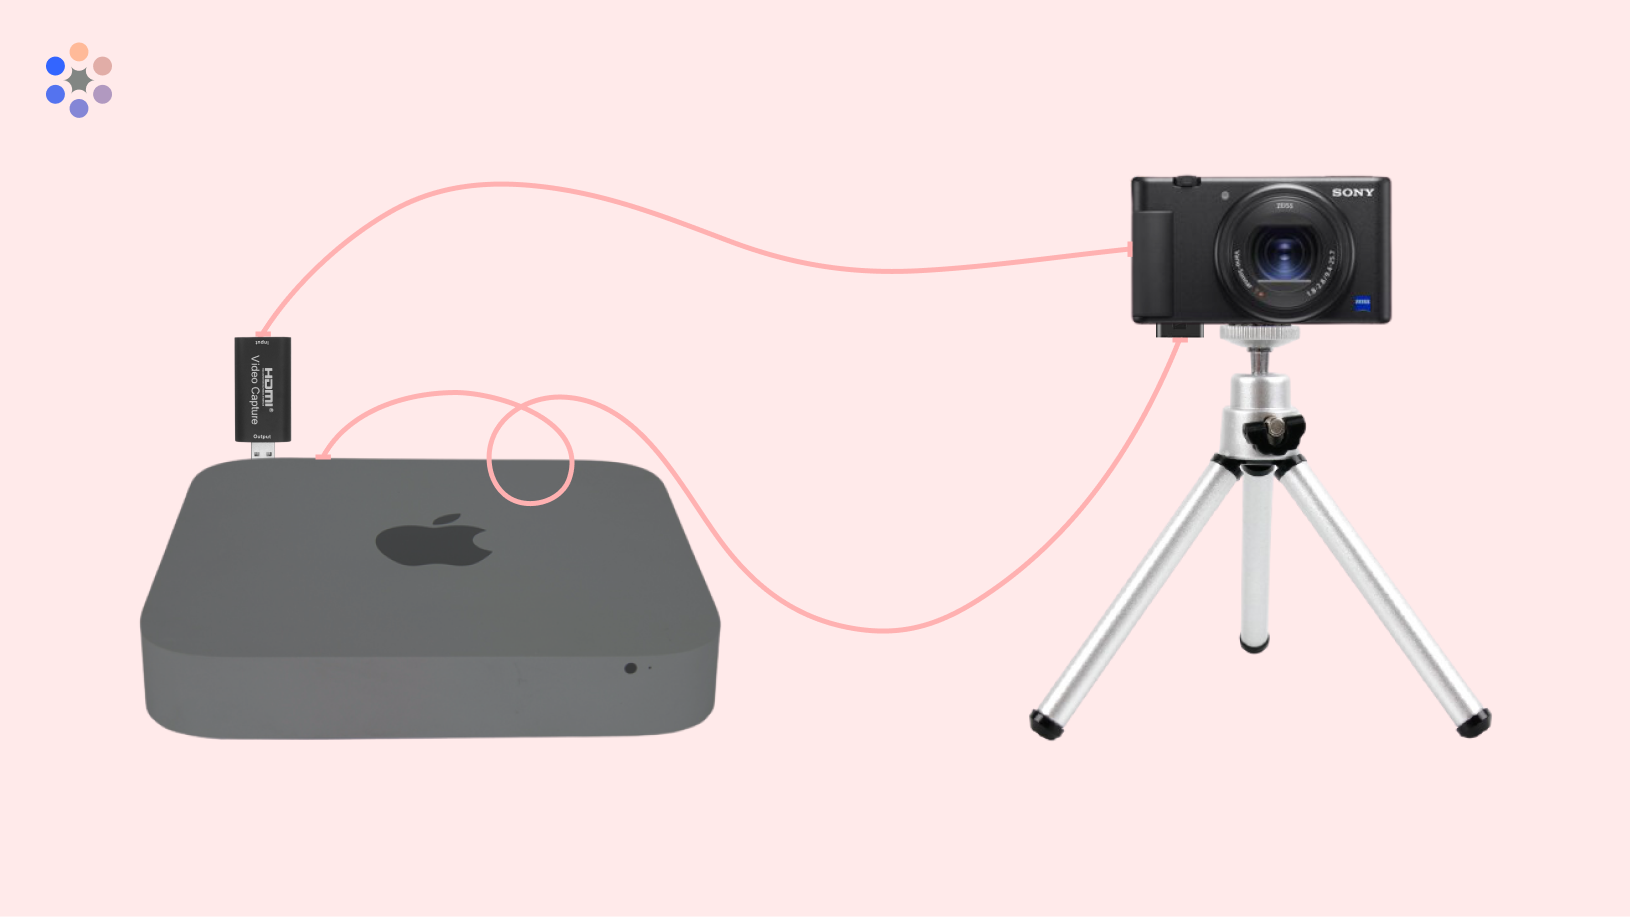
The grey box is the computer. The left USB port at the back contains an audio video capture card. Plugged into that is an HDMI cable leading to a micro HDMI input on the other end, which is plugged into the side of the camera. The battery in the bottom of the camera has been replaced with a dummy battery power adapter, which is plugged into the right-hand USB port on the computer. Finally, the camera is mounted on a mini tripod. The diagram is obviously missing other key pieces of equipment like the monitor, keyboard, mic etc., but hopefully it tells a clear story about the video aspect of the setup.
Although there are a few different bits of equipment to purchase and set up in this example, this is one way you can get super professional looking results from home. However, it’s absolutely not a requirement to be able to start streaming!
Audio
If you plan to speak on stream, you’ll need a microphone. This could be the built-in mic on your computer or laptop if it has one, and if you’re happy with the sound quality. As with the camera, you’ll want to use the best quality mic you have access to. People often listen to a stream while doing other things, so in many ways the mic is even more important than the camera quality.
There are a few different options available to you. We explore the pros and cons below and then look at accessories as well as general considerations around choosing a mic.
Headset
You can pick up a decent headset with a mic relatively inexpensively, and it can be a good space-saving option, plus it does two jobs in one, because headphones are built in. They’re also usually decent at minimizing ambient noise because of their proximity to your mouth.
Headsets can be wired or wireless. Bear in mind that wireless mics can be a little less reliable generally, as they introduce more points of potential failure, for instance if your bluetooth connection drops out.
A lot of people will recommend that you use a standalone mic over a headset, and while the sound quality is usually better with a standalone mic, a good headset will absolutely do the job too.
Lavalier
This is also known as a lav, lapel or clip-on mic, and it’s the TV-presenter style microphone that you attach to your clothing, generally around 6-8 inches from your mouth. Again, these can be wired or wireless, with wired being more reliable as explained above.
As with headsets, a lapel mic can be a good space saving option if you don’t have room on your desk for a mic, but with the added bonus of looking even more minimal. It also means you don’t need to worry about moving around a little bit, as the mic moves with you. Again, you may not achieve the highest possible quality compared to a standalone mic, but it’s another fine choice if it works for your needs and budget.
Standalone mics
There are two types of connectors for standalone mics: USB and XLR.
As you might expect, a USB mic simply plugs into the USB port on your computer. An XLR mic needs to be plugged in to an audio interface — a box-like piece of kit with several inputs and dials — which you can then plug into your computer via USB. So with an XLR mic, it’s worth noting that you need to buy an extra piece of equipment.
Hardcore audiophiles may claim that XLR mics are superior to USB mics but the results can often be indistinguishable to the average listener. A good USB mic will do the job in most cases and is quick to set up, but if you’re looking for greater professionalism and more fine-tune control, an XLR plus audio interface may be a worthwhile investment.
You may also see people talking about condenser vs dynamic mics. This refers to how the mic is built, and again there’s no one right answer for which one you should use. Condenser mics tend to be used in studio settings while dynamic mics tend to be used at live shows as they handle louder sounds better, but this isn’t a hard and fast rule. On balance, a condenser mic will probably give you a slightly clearer, richer result.
Whichever type of standalone mic you go for, you can either get a stand and position it on your desk, or attach it to a boom arm so you can move it around while saving desk space. Most boom arms have a clamp at the other end so you can fix it to the edge of your desk.
Audio accessories
To go with your mic, you’ll probably need a pair of headphones (if you’re not already using a headset). As this doesn’t impact what your audience will hear on stream, we’d just recommend going for whatever is most comfortable and within budget.
If you’re using a standalone mic, you might want to grab a shock mount and/or pop filter, both of which you can buy from around $10. A shock mount absorbs vibrations if you accidentally knock the mic or desk, and a pop filter helps stop your breath from hitting the ic as hard, so softens any harsh sounds. You can also experiment with positioning your mic in such a way to reduce popping sounds (known as plosives) — slightly below your mouth and slightly off centre tends to allow the air to pass over it more smoothly while still picking up your voice clearly.
We suggest you try doing some test recordings with your audio setup first to see whether you need to buy these accessories or tweak your setup generally. Additionally, there are ways you can optimize your space for capturing great audio. Soft furnishings help reduce echo, or you can affix some sound absorption panels to your wall like the pros do.
Lighting
Natural light is preferable, but it’s also highly variable, so you’ll need a back-up plan. Ideally, you should have at least one key light aimed at your face to illuminate you. A lamp can also do the trick.
If you have the space and budget, get two light sources (the second one is known as a fill light) and position them on either side of your camera, both aimed at your face, to achieve a professional-looking two-point lighting effect. Many key lights also come with options for adjusting the warmth and intensity of the light, giving you more control.
Another option is to use a ring-light, which you can position around your camera if space will allow. This will illuminate your face very effectively, though it can also cast a tell-tale glow around your pupils.
With your face well lit, you may also want to have a soft light in the background so you don’t look like you’re swimming in darkness. Here’s where you can have fun with different colored ambient lighting, fairy lights, neon signs, or whatever else speaks to you! If your camera will allow you to adjust the depth of field so as to blur the background, you can achieve an attractive and professional looking bokeh effect.
Softbox lighting is another option, but it takes up more space and probably isn’t worth it for the average streamer, unless you also plan to film other things where you need to light the whole room.
You can also get creative and experiment with old-school methods, like diffusing light by placing a piece of (non-flammable) fabric over a lightsource, or adding more shadow by obscuring part of the light source with a piece of card. Reflective objects can also help bounce light around, giving you might bang for your buck without needing to buy an additional light source.
Other accessories
Now here’s where you get to have a little fun! If streaming is something you’ll be doing regularly, you might want to invest in a switching device. They’re not particularly cheap, but they enable you to assign a bunch of pre-set options to specific hot-keys, for quick changing of camera angles, scenes, lighting and more during a stream.
Another fun option can be to position a green screen behind you. This will allow you to display your head and shoulders as an overlay on a different background, for example a slideshow — as well as pretend you’re streaming from the Bahamas!
Space and budget permitting, a second monitor can be very useful for streamers, because you can keep an eye on the chat on one side, while streaming from the other.
How to run a successful livestream
Let’s say you’ve got an AV setup you’re happy with, you’ve decided what platform to stream on, and you’ve chosen and downloaded a streaming tool to run your broadcast. What happens now?
While there’s no single right way to run a livestream, the following is a tried and tested approach that we frequently use to run successful, professional-looking livestreamed events on Vito.
Ahead of your stream
Planning
You’ll need to pick a time for your stream. As it’s online, that means folks from anywhere in the world could technically attend, but unfortunately there’s no perfect time that works for all timezones so you’ll largely need to make your decision based on where the majority of your audience will likely be tuning in from, and what time makes sense for the content (e.g. should it be during work hours or would evenings/weekends make more sense?). Plus of course, you should time it around what’s convenient for you and any guests who’ll be appearing live on stream.
Next, you might want to make arrangements so that you’re not likely to be interrupted during the stream. This isn’t always possible of course, but if you let the other people in your office or household know that you’ll be streaming, they’ll know not to disturb you during. Block out the livestream time plus a half hour buffer in your calendar, to avoid people accidentally booking a meeting with you right when you’re meant to start streaming.
Now’s the time to do some marketing to promote your livestream so that you know people will show up! This topic could be a whole post in itself, but for the sake of brevity, you’ll need to ensure you’re reaching your audience wherever they tend to spend time, whether that’s via their inbox, social media or some other way. Be clear about the date and time (and time zone) of the stream, and let people know how to register, where to watch and any other useful joining instructions. Send a timely reminder, around 30 minutes before the start of the stream, to let people know it’s about to start.
If this will be your first stream, now is also a good time to have a play around with the streaming software and go through the preferences to configure things the way you want them. Now we’re ready to set up the stream itself, which you can do a few days before the event if you’d like to run a few tests before going live, which we highly recommend.
Pre-recorded videos and holding slides
First we suggest that you collect any pre-recorded clips you’ll need, for instance your speakers’ presentations if you’re running a conference. Label them clearly and ideally file them in one place so they’re easy to locate when setting up your stream.
If you’re working with third parties like speakers who’ll be submitting pre-recorded video to you, we recommend providing some guidelines so that the clips look consistent. If you’re not sure what advice to give them, check out our video advice for event speakers that you can adapt for your own needs.
For professional results, it’s nice to include a “sting” at the start of your video. This is a short 5-10 second clip with your logo and the title of your event or stream. This can be static or animated; silent or with a catchy jingle. It’s just something to play at the start of your stream to set the tone.
You may also want to create some holding slides for different scenarios, in case you need to switch to them during the stream, for instance “Break”, “Intermission”, “Technical difficulties. We’ll be right back!” etc. 1920x1080 pixels is a size that usually works well for these.
It’s also a good idea to have a plain holding slide, on top of which you can place a countdown overlay. Most streaming tools have this feature built in. You can start the stream with this active, so that your audience knows the broadcast will begin soon.
We’ve also found musical interludes can work really well, for instance during breaks if you’re running a longer stream like a conference, to give people a mental break and a chance to chat. Though it’s “live” music, we actually ask the artists to pre-record their set so that we can roll the clip with ease at the right time.
All of these clips and pieces of content will need to be set up as individual scenes within your streaming software (e.g. OBS Studio, Ecamm Live, etc.). You can find specific instructions in the help documentation for each tool, by searching something like “How to set up a new scene”.
Video calls
If you’re running an interview or panel as part of your livestream or event, you’ll need to bring the other people in via a video call (unless they’ll be with you in the room). There are different ways of doing this so it’s a good idea to investigate the options and select a method ahead of setting up your stream.
If you’re using something like StreamYard, that has in-built video calling, things will be pretty straightforward. That is unless you’re also planning to have pre-recorded video within the stream, in which case you’ll need to get creative with screen-sharing to bypass their 5 minute length limit for clips.
Ecamm Live has recently launched a new Interview Mode which allows you to bring up to four people into your broadcasts via a URL that you share with them. You can customize how everyone is displayed on screen and cut to different people’s cameras as needed. They’ll also be able to see what’s currently showing on the stream, for instance if you’re cutting to pre-recorded video. You’ll need to have Ecamm Live’s Pro subscription to use this feature.
There are lots more options for incorporating video calls into your stream via third party software like Zoom, Skype and Google Hangouts and screen-sharing. If you do an internet search for “chosen livestreaming app (e.g. OBS Studio)” + “conferencing app (e.g. Zoom)”, you’re sure to find plenty of useful tutorials for how to connect the two tools.
Set up your scenes and overlays
If you’ve never used the streaming software before, you’ll likely be able to find an introductory video online to help you familiarize yourself with the various options available. We recommend watching one or two at this stage before continuing.
Now it’s time to set up your individual scenes. These are the different things you’ll cut between, during your streaming session. Each pre-recorded clip will be its own scene, as will any holding slides.
You will probably also want to set up a scene that just has your webcam as the source, and you can activate this scene whenever you want to speak to your audience. If you have multiple cameras, you can set each one up as a scene so you can switch angles mid-stream.
Depending on the contents of your stream, you might also have a scene that is a screenshare of your browser or an app. If you’re running a video call, this will also need to be set up as a scene.
You can set up overlays at this stage as well. We already mentioned having a countdown overlay, but you can also add lower thirds to the bottom of a scene with the name and title of the person presenting, and you can toggle these on and off on-the-fly during your broadcast.
As you’re setting up your scenes, check the audio sources for each. For instance, while there’s a pre-recorded video playing, you probably don’t also want your mic to be audible, so make sure it’s muted for that particular scene.
You can also select what happens at the end of a scene, for example when a pre-recorded video finishes. There are options to auto-advance to the next scene or do nothing, in which case you’ll need to remember to manually switch the scene during your livestream.
We definitely recommend running a few tests ahead of time to get comfortable with how it all works.
Brief guests who’ll be live on air
If you’ll be dialling in anyone else to appear on the stream with you, you may want to invite them to one or two tests ahead of time. Additionally, provide them with clear timings, instructions and links for where they need to be on the day of the stream, e.g. a Zoom or Skype call, and alternative methods of contacting you if they have any issues connecting.
Run a test stream
In order to run a test stream, you’ll need to set up your stream key. Depending on which software you’re using, you may have been required to do this before you were even able to set up your scenes at all.
Your stream key and URL can be found in your account within the platform you’ll be streaming to. So you need to retrieve those details and plug them into the software you’re streaming from. As you can see from the below GIF, this stage looks pretty similar no matter what software you’re using:

Now that you’re ready to run your test stream, you’ll want to make sure it’s streaming to a page or event that’s hidden from the public for now, so that your audience can’t accidentally see it. Start the broadcast and cycle through your scenes, making sure to do all the things you plan to do during your real stream, even if for a shorter time. In addition to making sure everything looks good, you’ll want to make sure all the right sound is coming through — and that none of the wrong sound is audible at the wrong time!
Have your broadcast destination open in a new window or device and check that the stream is coming through to the platform OK, including all the relevant audio. It’ll have a ~20 second lag, which is totally normal. It can be a little distracting hearing the sound twice, especially if it’s your own voice! But it’ll give you peace of mind that it’s all working. End your stream when you’re ready to end the test.
If the platform you’re streaming to saves a copy of the broadcast, as Vito does, you can then re-watch your test stream to make sure it worked as planned.
If your stream involves other people on a call, make sure to include them in the test too. For instance if you’re running an event with speakers, you’ll not only want to make sure they know what the plan is one the day, but running a test gives you an opportunity to check their setup and make any adjustments.
Contingency planning
It’s worth having a few back-up options in place for things that could possibly go wrong. For instance you could have any live guests prepare a pre-recorded segment that you can roll if they’re unable to connect to the video call while you’re streaming.
You could have some talking points available if you need to freestyle for longer than anticipated, and a “Technical difficulties” holding slide that you can cut to if things aren’t going to plan and you need a few moments to get everything sorted.
On the day
First things first, make sure your computer is plugged into the mains rather than running on battery, and that you have a reliable internet connection (see troubleshooting tips in the next section). Close down any apps you won’t be using so that your computer isn’t trying to do too many things at once. And you may want to disable notifications temporarily, especially if you’ll be sharing your screen during the stream.
Check your setup, lighting and background to make sure you’re happy with how everything looks on camera. Minimize noise by turning off fans or air-conditioning if you can, or shutting the windows if you’re on a busy street. If your mic is good at blocking out background noise then you might be able to get away with skipping this step.
As for the stream itself, we recommend starting by showing a holding slide with a countdown and beginning your broadcast a little earlier than the scheduled time. This will give people an indication that you’re definitely going to go live as planned.
Advise any speakers or panelists to be ready at the call link ahead of time so you can easily bring them in at just the right moment. The last thing you want to do is have to chase them while you’re on air! If you have any guests you expect might be unreliable, perhaps gently encourage them to submit a pre-recorded presentation instead. 😉
Now simply run through your prepared scenes according to your plan or schedule and, if you can, keep an eye on the chat on another device or have someone moderate it for you. This way you’ll be able to know if anything seems to be going wrong. We’ll go over some precautions and solutions to common issues in the next section.
From experience, the half an hour or so before a livestream can be really nerve racking, but that feeling usually dissipates once you get going, especially when you can see and react to people’s comments in the discussion area. Have fun with it if you can. If you’ve prepared your scenes well and run a couple of tests, things should be absolutely fine. And the odd mistake can even add to the charm of your stream — like a live blooper!
When you’re ready to finish streaming, say your thank yous and goodbyes and then select a generic holding slide scene and let that play out for a few minutes before hitting “End stream” inside your production software. This will ensure your stream doesn’t cut out prematurely.
After the stream
Depending on what platform you’re streaming to, a copy of the stream may be saved automatically for instant playback, or in your admin area so that you can download it and cut it up as needed. It’s a good idea to set your streaming software up to save a copy of the stream file locally on your computer as well for even quicker access so you don’t need to wait for it to download.
If you’ll be making the stream video available to watch on demand, it’s nice to trim it to remove the initial countdown before you publish it. That way, the video will jump straight into the action when a viewer hits play.
And you’re done! Why not take this opportunity to treat yourself to something you find relaxing and enjoyable? Livestreaming can be a bit of an adrenaline rush! We hope these tips will help you run a smooth and enjoyable livestream, but we’ve also got you covered for when sh*t hits the fan. Read on.
Troubleshooting common livestreaming issues
Sometimes things go wrong. Often it’s avoidable and occasionally it isn’t. Here’s a round-up of some lessons we’ve learned along the way and tips for how to reduce the risk of your stream going awry.
Connection issues
A wired connection is safer than relying on wifi. It’s also a good idea to keep your router’s firmware up to date, and update the drivers if needed. Additionally, you’ll want to keep your computer free of malware, and close down any unnecessary apps during streaming so that your connection isn’t trying to deal with too many things at once. You can also temporarily disconnect any unused devices from the network so that you’re not competing for resources.
If you’re running a high stakes livestream, such as for a conference or large-scale event, then you might want to load everything up ahead of time on another machine on a different network, so that you or a colleague can pick the stream back up from there if something catastrophic happens. If your platform has a chat function, you can quickly let people know what’s happening and that you’ll be back online soon.
Nerves and awkwardness
The first couple of times you run a stream, you may find yourself feeling nervous. We suggest preparing a simple outline or running order of the stream ahead of time so that you feel prepared. Bullet point format is ideal. List out the scenes in order, and note down any talking points you want to cover. Have this open in front of you during the stream, and don’t be afraid to glance at it when you need to. We’re used to seeing news anchors look at their notes on TV, so it’s totally fine to check them over whenever you need to.
You could write a full script and use a teleprompter app if you’re really worried about going off-piste or forgetting something, although it can lend your broadcast quite a stiff and unnatural air. Freestyling along to a general outline tends to come across as more conversational, and it doesn’t matter if you pause, fumble your words, or say “umm”.
Humour goes a long way to put your audience at ease too, for instance if you accidentally cut to the wrong scene or have a mishap due to nerves. These can sometimes be the most charming moments of a livestream, and can make your audience feel more connected to you.
Definitely run a test stream or two as outlined above, and perhaps get some trusted people to attend one of the tests. You’ll get to practice in front of a live audience, and they can give you feedback on what’s working and what could be improved.
Interruptions and distractions
We’ve already mentioned that you might want to make arrangements to minimize interruptions ahead of time. As well as blocking out your calendar and streaming from a quiet room, it’s a good idea to disable notifications on your computer and phone during the stream.
If you’re unexpectedly interrupted during the stream by something that urgently needs your attention, plan to have a fallback scene you can cut to. This could be a musical interlude or a bit of pre-recorded footage that keeps your audience engaged while buying you some time. Even a holding slide with some text saying “We’ll be right back” works in a pinch.
Technology fails
It happens. All your tests go just fine and then something breaks down on the day. Don’t panic! Put out a message to your audience, ideally in the same space the livestream is supposed to be happening, letting them know that you’re running behind due to a technical issue but that you’re working on it and hope to be online soon.
Meanwhile, try shutting down the streaming software (if that’s what’s causing the issue) and restarting it. Check that you’re using the right stream key and/or streaming to the correct destination. Check your internet connection is working properly.
Hopefully along the way, you’ll have identified the cause of the issue and fixed it. If not, consider having a back-up streaming software option. OBS Studio is free, open source and widely trusted. If you haven’t set up all your scenes there in advance, you could at least get on the stream by webcam and let people know what’s going on, “face to face”, and perhaps push the stream back by an amount of time.
If the technology fail is a hardware issue, such as your camera or microphone not working, it’s a good idea to have backups — even if they’re poorer quality, like your laptop camera or a headset mic. In many cases the issue isn’t actually hardware-related but is down to a setting, like having the wrong input selected or even being on mute! So make sure you’re familiar with the relevant settings ahead of time so that you can spot if something’s wrong.
Bonus livestreaming tips
Hopefully the last section didn’t frighten you off livestreaming! Although there’s a little bit of a learning curve and a few things to think about, on the whole streaming can be a lot of fun and a great way to connect with your audience.
We wanted to close out the guide with a few bonus tips to help you get even more out of streaming.
Fake a livestream
If you’re too nervous to go fully live just yet, you can always fake it for now by using an online tool to schedule a livestream. You just need to pre-record and edit the entirety of your broadcast into a single file — which gives you time to do retakes if needed — then upload it to a scheduling service to stream at a particular time in the future.
This approach gives you some of the benefits of livestreaming, like having everyone in your audience watch your video at the same time, while freeing you from the need to run your stream in real time. You could even schedule a stream to run while you’re asleep! There are a few solutions out there, but one we’ve tried and found effective is OneStream Live.
Add captions
If you can, it’s great to offer captions for your livestreams. Obviously this is super important for any deaf people and hard of hearing people in your audience, but they can also aid general comprehension in many scenarios and make your content more inclusive.
There are AI-powered options, like Thisten, which auto-transcribe sound from your microphone in real time. Or for more reliable results, if you have budget you could engage a professional captioning service, like the folks at White Coat Captioning.
Depending on where you’re streaming to, you can either display the captions as an overlay or provide a third party link where your audience can view the captions.
Mix it up
We’ve mentioned this in passing in earlier sections, but it’s a great idea to mix up your content and bring in fun elements and pre-recorded video if you can. There’s a lot to potentially distract people on the internet, so anything you can do to keep things interesting will help hold people’s attention. Plus it can be really fun to experiment with putting these assets together.
You could repurpose existing content, like videos from previous streams or events, and include a recap or a highlights reel with some upbeat music. You can create a professional looking intro sting very easily using something like Canva, and there’s plenty of royalty free music sites you can grab sound files from. You could include screenshots of social media messages from people in your community (with permission) and give them a shout out or answer their questions. This is a chance to get fancy with overlays, and display images next to you as you’re talking. If you’re telling a story, throwing a related visual up on screen can help add dimension.
When writing your outline for the stream, keep this idea in mind. Try and break the content into smaller chunks, so that you can create a rhythm for the broadcast. Even simple things like occasionally switching up the layout of the content on screen or making use of shapes and colors in your slide design can help keep things visually interesting.
Go forth and stream!
We hope you’ve found this beginner’s guide to livestreaming useful. There’s a lot of content and ideas in here so feel free to bookmark the guide and come back to it often at the different stages of your livestreaming journey.
If you find it helpful, please feel free to share it with your colleagues or friends who are also thinking of getting into streaming. And if you make use of any of our tips, we’d love to hear about it. You can tweet us at @vitocommunity. Happy streaming!